
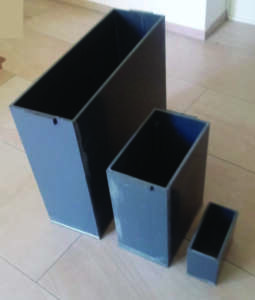
 First thing you will need is a vertical etching tank whereby height and length will dictate how large of a plate can go into the tank. The tank must be of plastic (any metal would be corroded) and should be rather slim i.e., the breadth should ideally not be much more than some 10 to 15 cm (4 to 5 inches). Not being able to find etching tanks which suited my needs, I started out with building them myself from 8 mm polypropylene PP plates; using transparent polycarbonate would have been my preference, but I found the cost of the plate material way too high for my first approach (and not knowing at that time, whether I like to continue with e-etching). I have built three tanks of different sizes, the smallest which holds about 2 liters to carry out strip tests. If you plan to do tests yourself, I have found this size very convenient when you use different electrolytes with different concentrations for different metals. For starters, cutting off the top of a plastic jerry can is a workaround but etching in a horizontal tray is also possible.
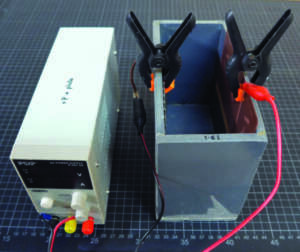
The next item in the setup is an adjustable AC to DC transformer which can handle a range of 0 to 10 V output. The higher the amperage (given in “A”) the better as this will decide how large of a plate you will be able to etch eventually. Quite suitable transformers you will be able to buy for some 60 to 70 USD. The photo shows the transformer and the small test tank already with anode (the copper plate to be etched) and the cathode which is either the same metal as the anode or a stainless-steel grid or mesh. Anode and cathode should ideally be approximately 6 cm (2 ½ inches) apart.
All you need now to start etching is the electrolyte which will electrically connect the two plates (anode and cathode).
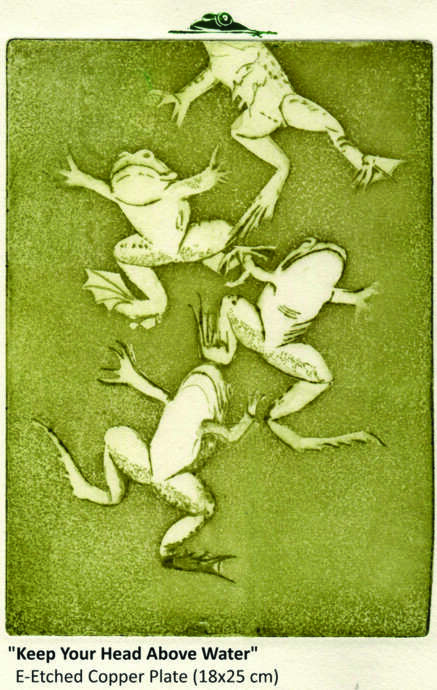
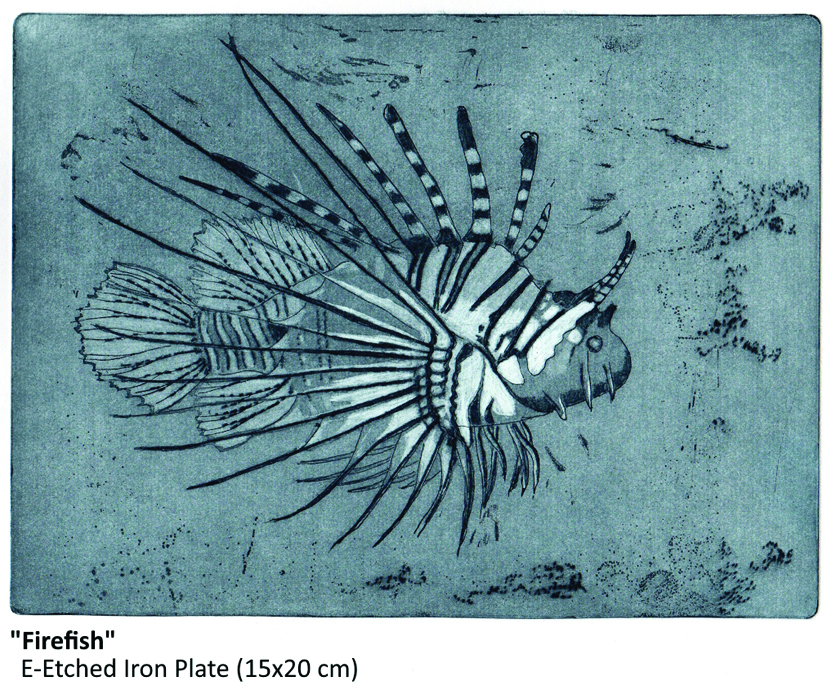
The type of metal of your plate to be etched determines the electrolyte you will need: the blue Copper Sulfate (CuSO4) for copper, the white Zinc Sulfate (ZnSO4) for zinc and the green Iron Sulfate (FeSO4) for iron.

All of the before mentioned sulfates can be bought in crystal form and have to be dissolved in de-ionized or distilled water to avoid potential and unwanted reactions with other chemicals/minerals in the water (e.g. chlorine). The concentration (the “strength”) of the electrolytes will determine the etching speed – generally, the higher the concentration, the faster the etching will progress. When mixing up the electrolytes take care to observe the SDS’s (Safety Data Sheets); once the electrolytes have been prepared, you can store them in plastic jerry cans. “Advantage One” of electro etching is that the electrolytes are not consumed or weakened through their use and there will be no precipitations that will require special disposal.
 The preparation of your plate is identical as you would etch chemically with a mordant: it is important to properly degrease the plate before applying the ground. I am now using almost exclusively BIG (Baldwin Intaglio Ground) and Graphite Ink grounds. Both can either be worked into while still wet as soft ground or as hard ground after drying or curing in an oven. BIG recommends 6 ½ minutes at 135°C for proper curing, graphite ink is about the same. Once dry, you can draw into it with a drypoint for line etches. You may be used to other grounds, and I have made numerous tests with different grounds, and they all work in general; however, some grounds tend to peel off at longer exposure to the electrolyte, so I suggest that you run some strip tests with your favorite ground before you engage in large plate etching. BIG is also proposing an alternative to rosin aquatint, the icing sugar aquatint – works like a charm and is much better on your lungs!
 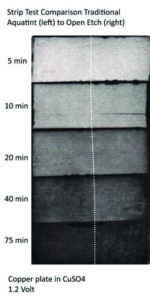 Talking about aquatint, there is an e-etch technique called “electro tint” which is my “Advantage Two”. If you expose an open area on your plate to electro etching, an even and solid tinting will result. Gradations can be etched and the longer the exposure, the deeper the grey (or eventually black), comparable to a traditional aquatint. However, there is one difference as from a certain point on any further e-etching will not deepen the black, but the process will only remove more metal from the open area.
Over the past years, I have seen good results e-etching copper, zinc and iron. Copper seems to respond best to this process. Iron and non-alloyed steels can also be electro etched with very satisfactory results. There are some opinions and publications around that aluminum can also be electro etched, but in my experience the results were suboptimal. With a recent change in the material composition for zinc, we have experienced some challenges not to say disappointments: the metallurgical industry has tried to improve the quality of zinc plates by adding small amounts of titanium and copper to the plates (now called “TitanZinc” in line with standards EN 988 and ASTM B69) to increase stability and corrosion resistance – this was certainly appreciated by the construction industry but an increased corrosion resistance is not quite what you want for etching. While line etches pose no problem, the open etch “e-tinting” has become quite a challenge.
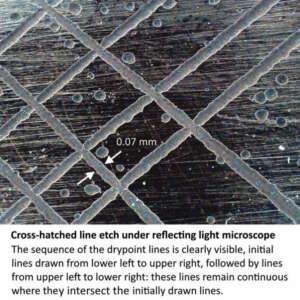
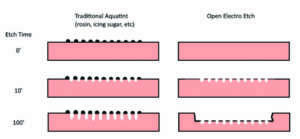 As mentioned, my technical background has led me to a systematic approach to e-etching with running numerous (over 200) test strips for copper, zinc, and iron varying electrolyte concentrations, applied etching voltages and distances between anode and cathode. Results have been analyzed not only by test prints but also in tabular form and under a reflecting light microscope where finally the “Advantage Three” was confirmed, that the lines actually etch straight vertically into the metal with no erosion (or corrosion) to the sides.
Over the past years, I have seen good results e-etching copper, zinc and iron. Copper seems to respond best to this process. Iron and non-alloyed steels can also be electro etched with very satisfactory results. There are some opinions and publications around that aluminum can also be electro etched, but in my experience the results were suboptimal. With a recent change in the material composition for zinc, we have experienced some challenges not to say disappointments: the metallurgical industry has tried to improve the quality of zinc plates by adding small amounts of titanium and copper to the plates (now called “TitanZinc” in line with standards EN 988 and ASTM B69) to increase stability and corrosion resistance – this was certainly appreciated by the construction industry but an increased corrosion resistance is not quite what you want for etching. While line etches pose no problem, the open etch “e-tinting” has become quite a challenge.
As mentioned, my technical background has led me to a systematic approach to e-etching with running numerous (over 200) test strips for copper, zinc, and iron varying electrolyte concentrations, applied etching voltages and distances between anode and cathode. Results have been analyzed not only by test prints but also in tabular form and under a reflecting light microscope where finally the “Advantage Three” was confirmed, that the lines actually etch straight vertically into the metal with no erosion (or corrosion) to the sides.
I would be glad to share more details of my tests and assessments, please contact me directly with your questions – or suggestions, as the case may be! [email protected] www.keicie.com